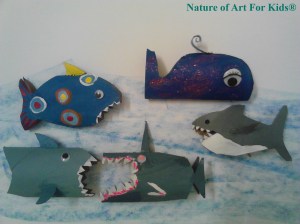
Beware kids love creating sharks out of paper rolls!
By Spramani Elaun
Kids have a special fascination with crafting sharks using paper rolls! A simple recycled paper roll can be magically transformed into a shark that will bring joy to children. This craft project is inexpensive to make. By utilizing materials you already have, you can save money and contribute to tree conservation.
The inspiration for this project came from one of my sweet young students who adores sharks. Determined to find an eco-friendly shark art project, I consulted my creative team, and voila… paper roll sharks were born! If you’re interested in learning how to paint with kids and setting up more projects like this, take a look at my new book, “Kids Painting.”
If you don’t know me, I’m Spramani Elaun a homeschool mom blogger, art teacher, author, and owner of an art supply store called Nature of Art® For Kids. I have taught thousands of children how to paint, draw, and craft. You can learn more about my work by reading my blogs, sign up for me weekly art newsletter, or check out my books.
This project satisfies all of my environmentally friendly criteria: it repurposes recycled paper rolls, it’s simple for young kids to create, and it sheds light on endangered animals by focusing on sharks—a captivating topic for study. Our eco-friendly acrylic paint is the perfect choice to bring these adorable shark creations to life. I’m going to share 4 areas you need to think about when setting up for this Shark Crafts For Kids:
- Craft Materials
- Set- up The Art Area
- Lesson Adjustable For All Ages
- Shedule The Time For Shark Craft
1. Craft Materials
- Recycled Paper Rolls
- Kids Paints – We use Nature of Art For Kids®
- Eyes googly eyes, fabric scraps or buttons can be used
- Paint brush – wide
- Paint palette
- Water jar
- Napkins
- Scissors
- Glue
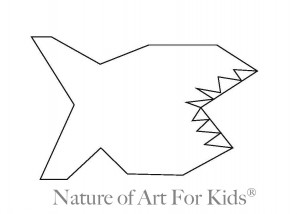
- Shark template shape
Materials Tips:
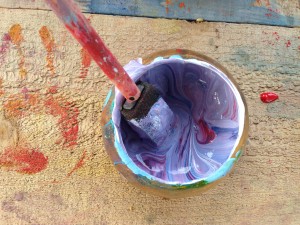
Acrylic paint is the optimal choice for paper rolls as it provides excellent opaque coverage over the cardboard surface. For this project, large and wide paintbrushes are recommended as they work best. Sponge brushes can also be effective for painting sharks. To hold the paints, a painter’s palette or an egg carton will serve as the ideal container.
Have a water jar available for dipping brushes and cleaning them between colors. Napkins are useful for cleaning paintbrushes or for wiping off any paint from hands. If there are paint stains on hands, baby wipes are fantastic for quick and easy cleanup.
Begin by cutting out the template pattern and placing it on top of a flattened paper roll for easy tracing. Ensure that the paper roll is flattened before tracing. You can use a pencil, marker, or crayon for tracing since the marks will be trimmed and painted over. Once the shape is traced, carefully trim it out with scissors, and then reshape the paper roll by unflattening it and rolling it back into its original form.
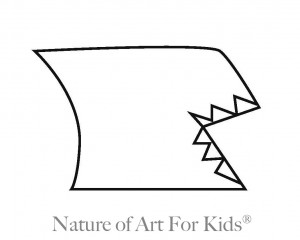
Print Out– Shark template
Cut template pattern out, place on top of flattened paper roll and trace. Be sure your paper roll is flattened for easy tracing. Anything will work for tracing, whether it’s a pencil, marker, or crayon, since he tracing marks will be trimmed and painted away. Once shape is traced, trim shape out with scissors and unflatten the paper roll, popping it back into a roll shape.
Fin making tips:
Use scraps to make a fin shape for a shark or fish creature. Glue fins on with glue or a glue gun. I‘ve found that it’s easier and I can get sturdier results if I cut a slit in the roll, and place the fin inside, and glue it to secure the fin in place. This helps the sharks fin last longer and stay in place while kids have fun playing with their sharks.
Teeth making tips:
You can make sharp teeth by drawing them ahead of the time on paper roll or just cutting them out free-hand. Kids can also just paint or draw on teeth with using white paint.
Eyes
Glue eyes on with children’s glue or a glue gun
2. Set- up The Art Area
- A space to get messy
- Good lighting
- Flat work-station
- Materials
- Smock or clothes that can get messy
It’s important to have a place children can get messy that will with stand messy spills. It’s important to set up in a place children can get messy. Be sure table and chairs are at the level of the child. Materials should be easy for children to reach during project making.
3. Lesson Adjustable For All Ages
This project can be achieved by many different skill levels and easily adjusted for toddler to middle aged kids. (Read more about this fame work n my new book, Nurturing Children In The Visual Arts Naturally©).
Paper roll prep for young children:
I recommend cutting sharks out ahead of time for kids under 5 years or kids not using scissors yet. Kids can paint and embellish with ease if the shapes are cut out ahead of the time.
Tracing and cutting (out templates) can work well with older kids(*). Allow independent kids to trace and cut out (their) shark(s) themselves. If your kids are fine motor capable then this is great for them. Be sure to have plenty of extras (extra) paper rolls for (replace “for” with “in case of”) mistakes. Young kids cutting out their own templates will need time to understand how the template pattern works by tracing and cutting it out with practice.
4. Shedule The Time For Shark Craft
The most important part of this project is allowing children time to explore and construct this project with their own hands. Older children will usually spend more time painting and embellishing their creatures. Mature students usually try different shapes other than sharks designs. For this project I recommend 15-30 minutes for younger children and 40 minutes -1 hour for older children.
The common process you can expect for these ages is:
15 months – 6 years: Children will learn to dip brushes into paint, learn to make brush strokes, play in palettes and mix paints, swish water around in jars, learn to spread paint over sharks and delight in the process. Most areas on the shark will not be covered completely. Using hands in paints and exploring by covering the art or table in paint) s common. This is all perfectly normal.
6 – 9 years old: Children will want to make their sharks unique and spend time exploring how the fins can create a different look on each shark.
Children of these ages quickly learn how to use materials and don’t need to be guided in the process of making. Only one or two demonstrations is necessary.
10 – 15 years old: Children will enjoy the mixed-media aspect of this project and create many different versions. Students at this level will spend careful time planning designs. These students can work independently and for longer durations of time.
Happy Shark Creating!

All rights reserved © 2025, Nature of Art®

No part of this blog may be used or be reproduced in any manner whatsoever including reproducing, publishing, performing, and making any adaptions of the work – including translation into another foreign language without written permission except in the case of brief quotations embodied in critical articles and reviews. Nature of Art® Publishing P.O. Box 443 Solana Beach, California 92075.



Pingback: Crayon Resist - Wax repels H2O! - EcoKidsArt.com()
Pingback: Easy painting for Kids, Painting Lessons for Children, crayon wax resist, art teacher Spramani Elaun | Nurturing Children In The Visual Arts Naturally – Books Author()